How to Sell Event Tickets on WordPress Without Transaction Fees
9 Sep 2026 · Eventnetic Admin

Eventbrite is the default choice for most first-time event organizers. It is easy to use, has a big audience, and takes zero setup. It also takes a cut of every ticket you sell.
Eventbrite's standard ticketing fee is 3.7% plus $1.79 per paid ticket, passed to buyers by default. On top of that, a separate 2.9% payment processing fee applies per order. Together, those charges add up quickly on a sold-out run. The full Eventbrite fees breakdown shows what those numbers look like at scale across different ticket prices and volumes. If you are still comparing platforms before committing, the best Eventbrite alternatives for WordPress roundup lines up Eventnetic against other self-hosted and hosted options side by side.
Selling tickets on WordPress cuts the platform fee to zero. Your Stripe or PayPal account receives the full ticket price. The only deductions are the payment gateway's standard processing rates (typically 2.9% plus $0.30 per transaction with Stripe), which apply regardless of where you sell tickets. You keep your audience data, control your checkout experience, and build your ticketing operation on infrastructure you own.
This guide walks through exactly how to sell event tickets on a WordPress site, step by step, using Eventnetic as the ticketing plugin. It covers installation, event setup, payment gateway connection, ticket delivery, and the free plan boundaries, so you know what you get before spending anything. This walkthrough focuses specifically on ticket sales configuration; for a broader look at planning the whole site around ticketing, from page structure to navigation, see how to sell tickets on WordPress on WordPress.
What You Need Before You Start
You need three things to sell tickets on WordPress:
- A WordPress site with admin access. Any WordPress hosting plan works. Shared hosting is fine for low-volume events; switch to managed hosting if you expect spikes of several hundred simultaneous visitors.
- A Stripe or PayPal account. Both gateways are free to create. Stripe is generally faster to set up and has better support for multiple currencies. PayPal is familiar to buyers who prefer not to enter card details on a new site.
- A ticketing plugin. This is the software that handles event creation, capacity management, checkout, and ticket delivery on your site.
If you want to run your first events without accepting card payments (cash at the door, bank transfer, or invoice), you can do that on the Eventnetic free plan. Online card payments are unlocked at the Starter tier ($99/year). More on that boundary below.
Step 1: Install Eventnetic
Eventnetic is distributed directly from the Eventnetic website rather than through the WordPress.org plugin directory. To get it:
- Go to eventnetic.com and click Download free (or navigate directly to the pricing page).
- Download the plugin zip file to your computer.
- In your WordPress admin panel, go to Plugins > Add New Plugin > Upload Plugin.
- Click Choose File, select the downloaded zip file, then click Install Now.
- After installation completes, click Activate Plugin.
An Eventnetic menu item appears in your admin sidebar immediately after activation. The plugin runs entirely on your server. There is no external account to create, no SaaS dashboard to log into, and no platform-level access to your customer data.
The free plan activates automatically on installation. You can create your first event immediately without entering payment details or a license key.
Step 2: Create Your First Event
Navigate to Eventnetic > Events > Add New Event.
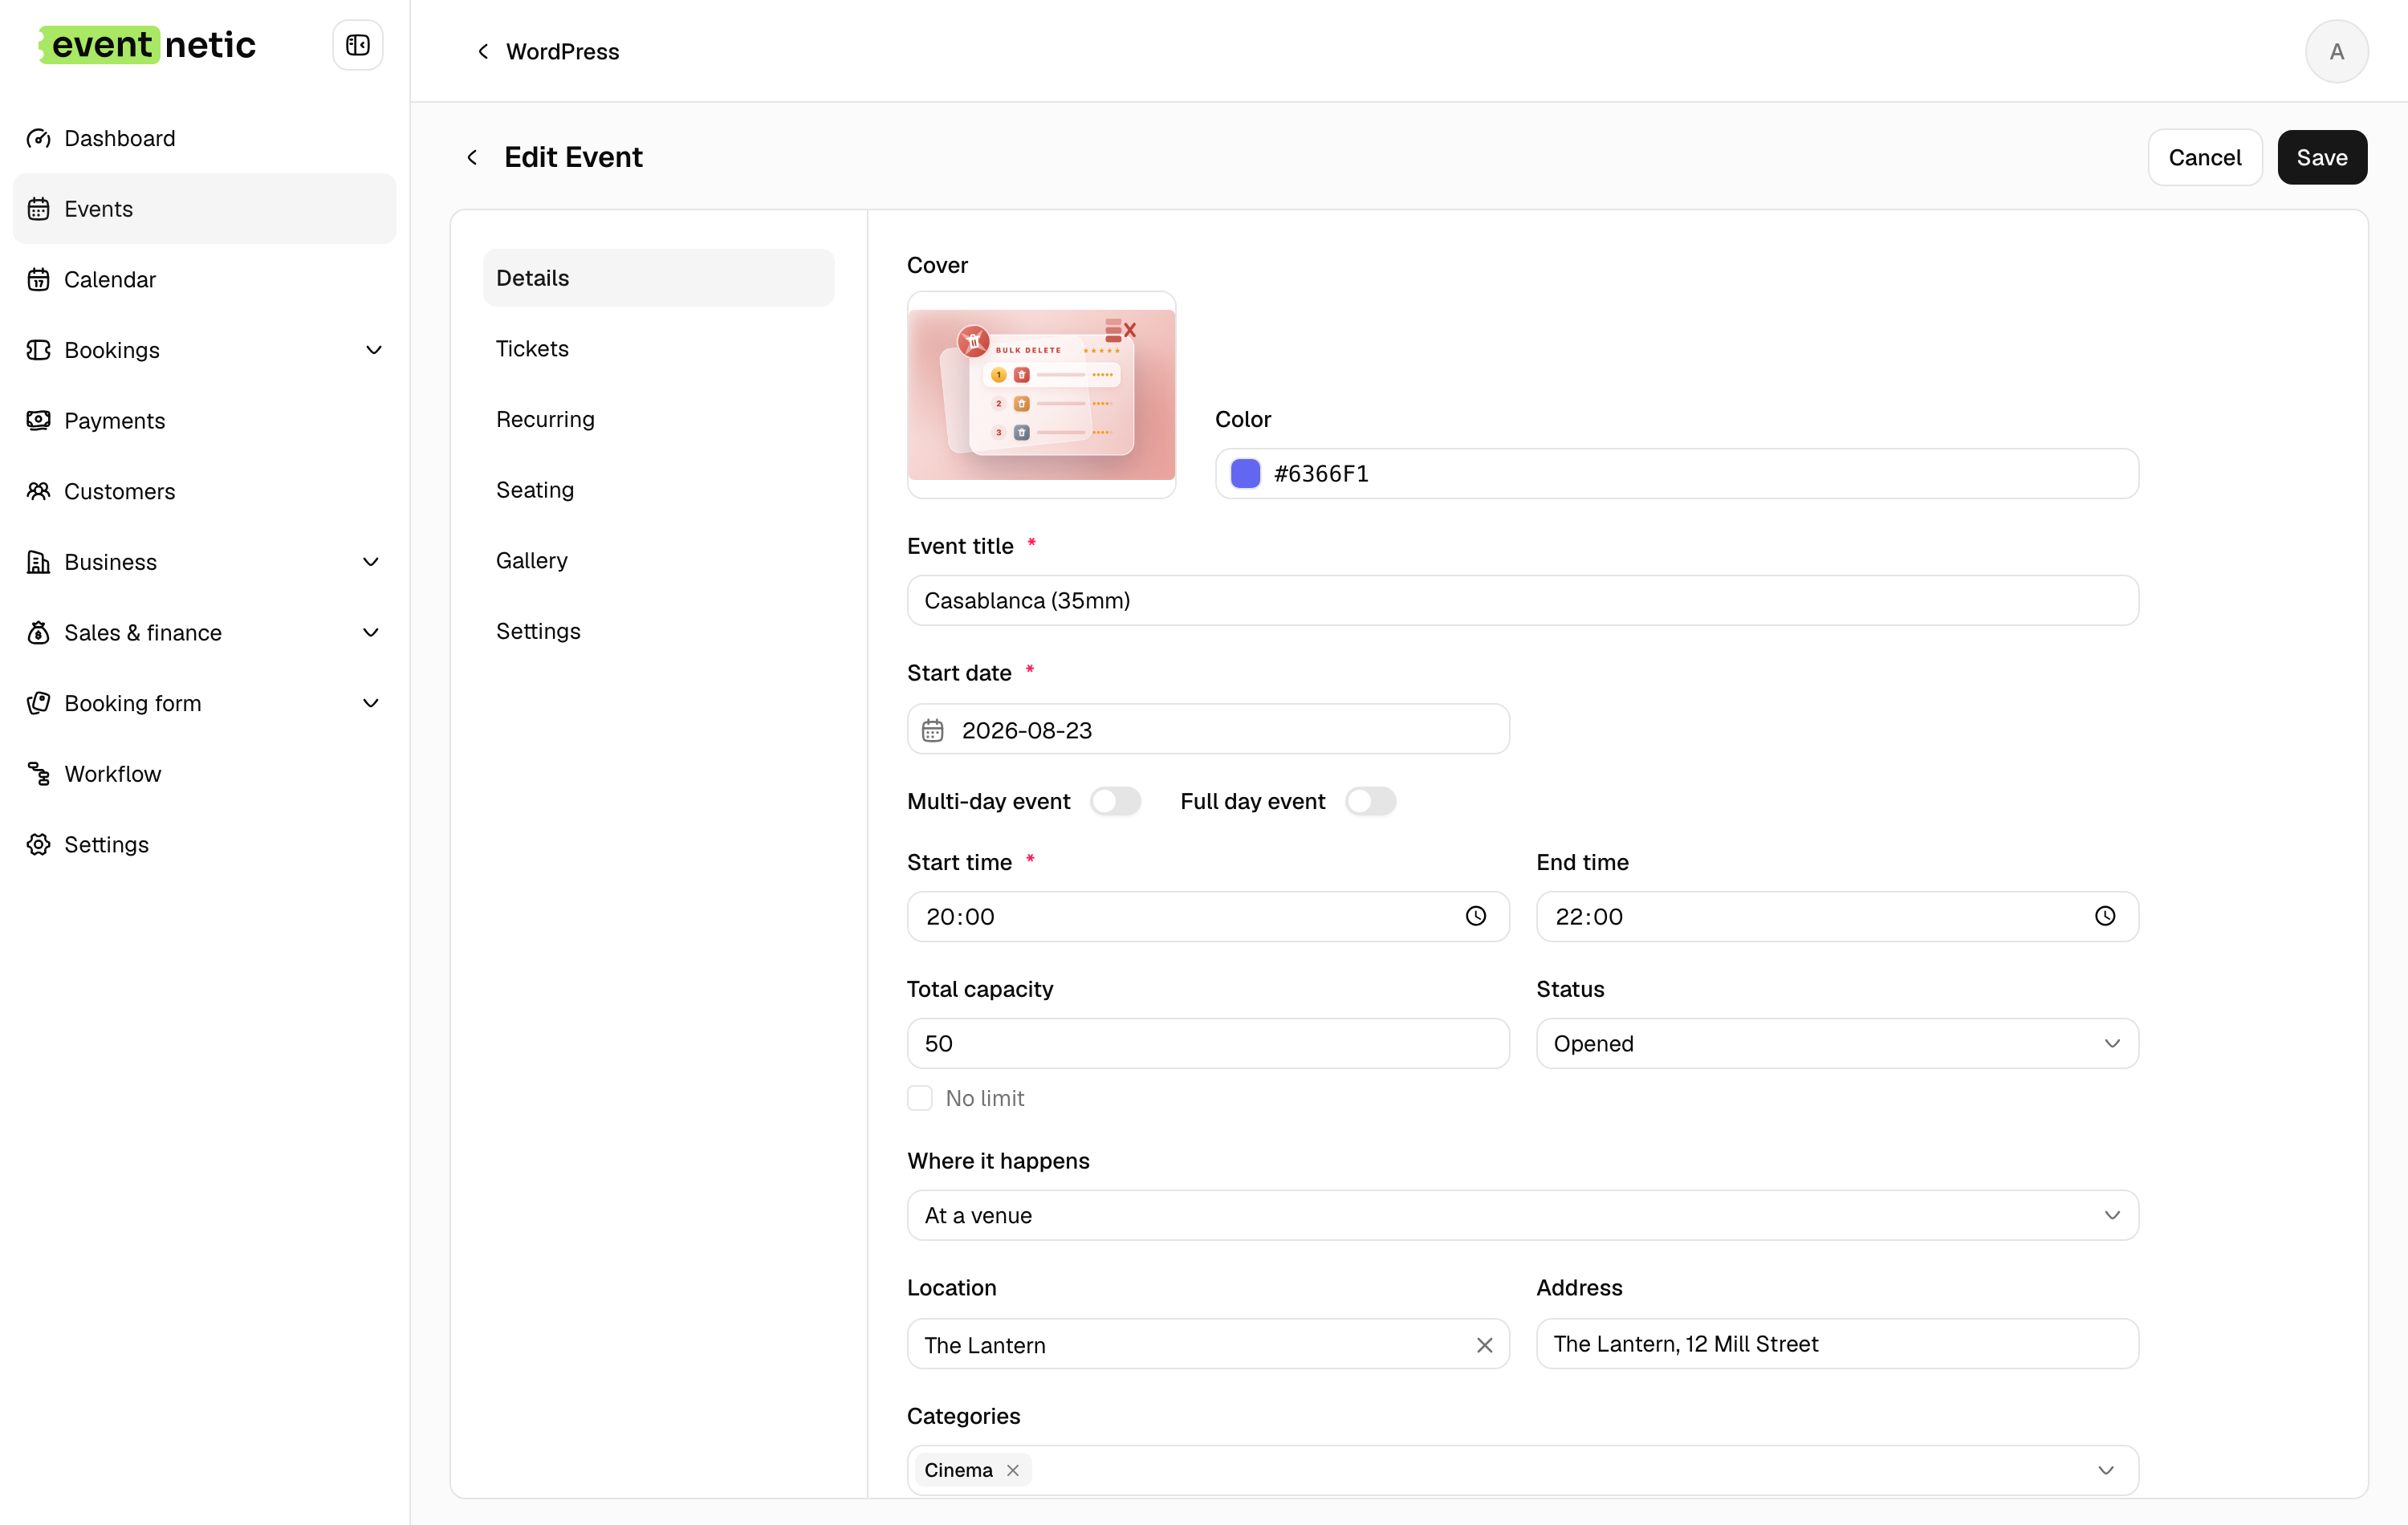
You will see a setup panel with the following fields:
- Event name and description. The name becomes the page title; the description appears on the public event listing.
- Event date and time. Set a single date, or enable recurring dates to schedule a weekly class, monthly meetup, or touring show series.
- Location. Add a physical venue address, a virtual event link, or both.
- Capacity. Set the total number of attendees the event can accept. The plugin tracks real-time availability and closes ticket sales automatically when capacity is reached.
- Event image. Upload a banner or photo for the event listing page.
Recurring events note: If your program runs on a schedule (a weekly yoga class, a monthly dinner, a tour with multiple city dates), enable the Recurring toggle and set the pattern. Each date in the series can carry its own capacity and price, so a Saturday evening show can cost more than a Tuesday matinee without creating separate events.
Save the event as a draft while you configure ticket types in the next step.
Step 3: Set Up Ticket Types
Under the event settings, open the Tickets tab.
Click Add Ticket Type to create your first tier. Each ticket type has:
- Name. Early Bird, General Admission, VIP, Group of Four, and so on.
- Price. Set per unit. Leave at zero for free tickets.
- Quantity. Limit how many of this tier can be sold. When a tier sells out, it disappears from the public checkout without taking down the rest of the event.
- Sale window. Set a start and end date for the ticket type. Early Bird tickets can go on sale two months out and automatically close on a fixed date, switching buyers to the standard General Admission tier.
- Per-order limit. Cap how many tickets one buyer can purchase in a single transaction.
Most events need two to four ticket types. Complex setups with VIP, group discounts, and early-bird phases can use more, but keep the buyer experience clean: too many tiers at checkout increases abandonment.
Discount codes are available on the Starter plan. Create a single-use code for press and sponsors or a multi-use code for an email campaign.
Step 4: Connect a Payment Gateway
This step requires a Starter plan license or above.
Go to Eventnetic > Settings > Payments.
You will see toggle options for Stripe and PayPal. Enable the gateway you want to use, then follow the on-screen authorization flow:
- Stripe: Click Connect with Stripe. You will be redirected to Stripe's OAuth screen to authorize the connection. Once authorized, payments flow directly into your Stripe account. Eventnetic does not sit between you and Stripe; it does not collect, hold, or touch the funds.
- PayPal: Enter your PayPal Client ID and Secret from your PayPal Developer account. PayPal payments settle into your PayPal balance. You can transfer to your bank on the usual PayPal schedule.
Commission: Eventnetic takes no platform commission on any plan. The only deduction from each ticket sale is the gateway's standard processing fee (typically 2.9% plus $0.30 per transaction with Stripe). That fee goes to Stripe, not to Eventnetic.
After connecting a gateway, return to your draft event and publish it. The public event page will now include a live checkout form.
Step 5: Configure Ticket Delivery
After a buyer completes checkout, Eventnetic sends a confirmation email automatically. On the Starter plan, each confirmation includes a PDF ticket attachment with an individual QR code.
Go to Eventnetic > Settings > Email to customize the confirmation template: sender name, reply-to address, subject line, body text, and logo. The ticket PDF is generated from the buyer's order data and attached per ticket, so a buyer who purchases three tickets in one order receives three separate PDFs with three unique QR codes.
QR check-in: The Eventnetic check-in system is built into the plugin. Staff can verify tickets at the door using any device with a camera and a browser. Scan the QR code and the system marks the ticket as checked in, preventing re-entry on the same ticket.
For events where staff need offline scanning capability (underground venues, areas with poor signal), the Starter plan also includes a code-based check-in option: door staff can enter the booking reference manually to verify a ticket without scanning.
Step 6: Publish Your Event and Test the Checkout
Before sharing the event link publicly:
- Open the public event page in an incognito browser window.
- Select a ticket type and click through to checkout.
- Use Stripe's test card numbers (available in your Stripe dashboard under Developers > Testing) to complete a test purchase without charging real money.
- Confirm that the confirmation email arrives, the PDF ticket is attached, and the QR code is readable.
- Go to Eventnetic > Bookings in your admin to confirm the test booking appears with the correct details.
Once the test passes, switch Stripe from test mode to live mode in your Stripe dashboard, and your event is ready for real ticket sales.
What the Free Plan Covers
The free plan is more complete than most event plugins offer at zero cost. It includes:
- Unlimited active events
- Unlimited bookings
- Multiple ticket types with custom pricing
- Capacity management and real-time availability tracking
- Email automation with multiple event triggers (booking confirmation, reminder, cancellation, and more)
- Check-in by name or booking reference
- Full analytics dashboard
The free plan processes offline and cash payments only. Buyers can select a payment-pending ticket, show up, and pay at the door. Online card payment (Stripe, PayPal) requires the Starter plan.
If you are running a community event, a free entry program, or testing your setup before committing to a paid plugin, the free plan covers the full ticketing workflow short of online payment. The free WordPress event ticketing guide covers exactly what you can do without a license and where the boundary sits.
What the Starter Plan Adds
Eventnetic Starter costs $99/year for one site (or $199 as a one-time lifetime purchase). It unlocks every paid feature the plugin offers:
- Stripe and PayPal checkout
- WooCommerce checkout (for stores that already run WooCommerce)
- PDF tickets with individual QR codes
- QR code scanning at the door
- Seat maps with assigned seating (sections, tiers, individual seats)
- Recurring event series with per-date pricing
- Discount codes with limits and expiry
- Invoicing with a custom number series
- Waiting lists with automatic expiring offers
- Telegram, SMS, and WhatsApp notifications
The Pro plan ($199/year) and Elite plan ($299/year) include all the same features. The difference is site count: Starter covers one site, Pro covers five, and Elite covers twenty-five. If you run one WordPress site, Starter is everything you need.
All paid plans come with a 14-day money-back guarantee.
Cost Comparison: Eventnetic vs Eventbrite
To illustrate the difference, consider a small venue running 12 events per year, each selling 100 tickets at $25 (1,200 tickets total, one ticket per order).
| Cost item | Eventbrite | Eventnetic + Stripe |
|---|---|---|
| Platform/service fee per ticket | 3.7% + $1.79 = $2.72 | $0 |
| Payment processing per order | 2.9% = $0.73 | 2.9% + $0.30 = $1.03 |
| Annual plugin/license cost | $0 | $99 |
| Total fees for 1,200 tickets | $4,140 | $1,335 |
| Estimated annual savings | ~$2,805 |
A few important notes on the table:
- Eventbrite's service fee and payment processing are passed to buyers by default, so they inflate the buyer-facing ticket price rather than reducing the organizer's payout. The organizer typically receives the full $25 face value; the buyer pays $25 plus fees at checkout.
- Eventnetic has no platform fee at all. The Stripe processing fee (2.9% + $0.30 per transaction) comes from the organizer's revenue, as it does with any self-hosted checkout.
- The direction of the comparison is consistent regardless of how fees are framed: total money extracted from the transaction is substantially lower on a self-hosted setup.
For a more granular breakdown of what Eventbrite charges across ticket price points and plan scenarios, the Eventbrite fees post covers the math in full detail.
Frequently Asked Questions
Can I sell tickets on WordPress for free?
Yes, with some limits. The Eventnetic free plan supports unlimited events and unlimited bookings at no cost, including multiple ticket types, capacity management, and email confirmation. Online card payments (Stripe, PayPal) require the Starter plan at $99/year. For events where attendees pay at the door or via bank transfer, the free plan covers the complete workflow.
Is there a WordPress ticket plugin with no commission?
Eventnetic takes zero platform commission on every plan, including the free plan. The only deductions from ticket revenue are the payment gateway's standard processing fees, which go to Stripe or PayPal rather than to the plugin. Several other plugins also operate on a zero-commission model; the best WordPress event plugins comparison covers the main options side by side.
What payment gateways does Eventnetic support?
Stripe and PayPal are available from the Starter plan. WooCommerce checkout, which gives access to WooCommerce's full gateway library, is available on the Elite plan. The free plan supports offline and cash payment collection only.
Do buyers get a proper ticket with a QR code?
Yes, from the Starter plan. Each buyer receives a PDF ticket by email after checkout, with one individual QR code per ticket purchased. Staff scan the QR code at the door using any device with a camera and a browser. On the free plan, check-in is handled by name or booking reference instead of a QR code.
Can I sell tickets for recurring events (weekly classes, monthly dinners)?
Yes. Recurring event support is included in the Starter plan. You create the event once, set the recurrence pattern (daily, weekly, monthly, or custom), and each date in the series carries its own capacity and optional price. Buyers purchase a ticket to a specific date rather than the series as a whole.
Does Eventnetic work with any WordPress theme?
Yes. Eventnetic generates its own event listing and checkout pages using shortcodes and Gutenberg blocks that work alongside any theme. The plugin's public-facing styles are minimal by design, so the event pages pick up your theme's typography and color palette.
What happens if I want to move away from Eventnetic later?
Your event data, booking records, and customer emails are stored in your own WordPress database. You own the data. If you switch plugins, you can export your booking records as CSV from the Eventnetic dashboard before deactivating.
Next Steps
To start selling tickets on WordPress today:
- Download Eventnetic from eventnetic.com and install it via Plugins > Add New Plugin > Upload Plugin.
- Create a free account on Stripe or log into your existing PayPal account.
- Build your first event and add your ticket types.
- If you are on the free plan, publish the event and start collecting offline bookings immediately.
- Upgrade to Starter ($99/year) when you are ready to enable online card payments, PDF ticket delivery, and the full paid feature set.
The setup takes under an hour for a standard single-date event. Once the first event is live, each subsequent event takes minutes to configure using the same settings.
Choosing a Domain Name for an Event Ticketing Site
Your domain is the address visitors type to reach your ticketing site. Register through a reputable domain registrar such as Namecheap or Squarespace Domains, or directly through your hosting provider if it offers a bundled domain. Most .com domains cost $10–$20 per year. Watch out for registrars that advertise a low first-year rate and quietly renew at a much higher price.
Naming tips specific to a ticket-selling site:
- Use your organization name, not a generic descriptor.
riverside-theatre.comis clearer and more brandable thanwordpresseventtickets.com. - Keep it under 20 characters. Shorter domains are easier to share verbally and in print materials.
- Avoid hyphens when alternatives exist. Hyphens are harder to say aloud and easier for buyers to forget.
Choosing a Hosting Plan: What Matters for Ticket Sales
WordPress requires PHP 8.1 or higher, MySQL 5.7+ (or MariaDB 10.4+), and Apache or Nginx. These are the same minimums required by most modern ticketing plugins. Most current shared hosting plans meet them by default.
Hosting tiers explained for event organizers
Shared hosting (SiteGround, Hostinger, Bluehost; $3–$15/month) is the right starting point for most new ticketing sites. It handles moderate traffic without issue. For sites selling tickets to occasional events with up to a few hundred simultaneous visitors, shared hosting is sufficient.
Managed WordPress hosting (Kinsta, WP Engine, Flywheel; $25–$50/month) is a better fit if you expect traffic spikes at ticket launch dates or need high reliability. You get automated daily backups, staging environments, and WordPress-specific support teams. The extra cost is justified when a site outage during a ticket release has real financial consequences.
VPS or cloud hosting suits high-volume sites with sustained traffic or multiple concurrent events running simultaneously. It requires more configuration but gives you full control over server resources.
Regardless of tier, choose a host that:
- Supports PHP 8.1 or higher
- Provides a free SSL certificate, which is required for secure checkout pages and browser trust signals
- Includes daily backups or easy backup tooling
- Offers a one-click WordPress installer
WordPress Configuration Steps That Affect a Ticketing Site
Most WordPress guides skip these two settings, but they have a direct effect on an event ticketing site:
Timezone (Settings > General)
Set your timezone correctly before creating any events. WordPress uses this timezone when displaying event dates and times to visitors. A mismatch between server time and your real timezone produces wrong start times on event pages and in confirmation emails. That is a damaging error for ticket buyers who plan travel around those times.
Permalink structure (Settings > Permalinks)
Select Post name as the permalink structure. This produces clean, readable event URLs such as yourdomain.com/events/summer-concert rather than numeric IDs like ?p=42. Clean URLs are better for sharing on social media and in print, and they improve search indexing for individual event pages. After changing this setting, click Save to flush the URL rewrite rules, even if nothing appears to change. Failing to do this can leave event pages returning 404 errors.
Theme and Design Considerations for Ticket-Selling Sites
The theme's primary job on a ticketing site is different from a blog or portfolio. It controls the site navigation, header, footer, and surrounding design. The event listing, event detail pages, and the checkout itself are generated by the ticketing plugin via shortcodes embedded in standard WordPress pages. This means:
- Any well-maintained WordPress theme is compatible. You are not locked into a theme marketed as an "event theme." The ticket-buying flow lives inside the plugin, not the theme.
- Prioritize navigation clarity over visual complexity. Buyers need a direct path from the homepage to the events list to the checkout. A theme with clear top navigation and minimal distractions in the content area performs better than a visually dense theme built for portfolios or agencies.
- Ensure the theme is mobile-responsive. A significant share of ticket buyers will land on your event page from a social media link on a phone. A non-responsive layout loses those conversions at the moment of discovery.
- Avoid themes with heavy JavaScript frameworks that block page load. Checkout pages where a buyer has already decided to purchase should load immediately. Themes built around large page-builder scripts can introduce delays that increase abandonment at the final step.
Install a theme from the WordPress theme directory or a premium marketplace for a custom look. Lightweight, block-compatible themes (such as Astra, Kadence, or GeneratePress) are well-suited to ticketing sites because they load quickly and integrate cleanly with shortcode-based plugin content.
Page Structure and Site Navigation for a Ticketing Site
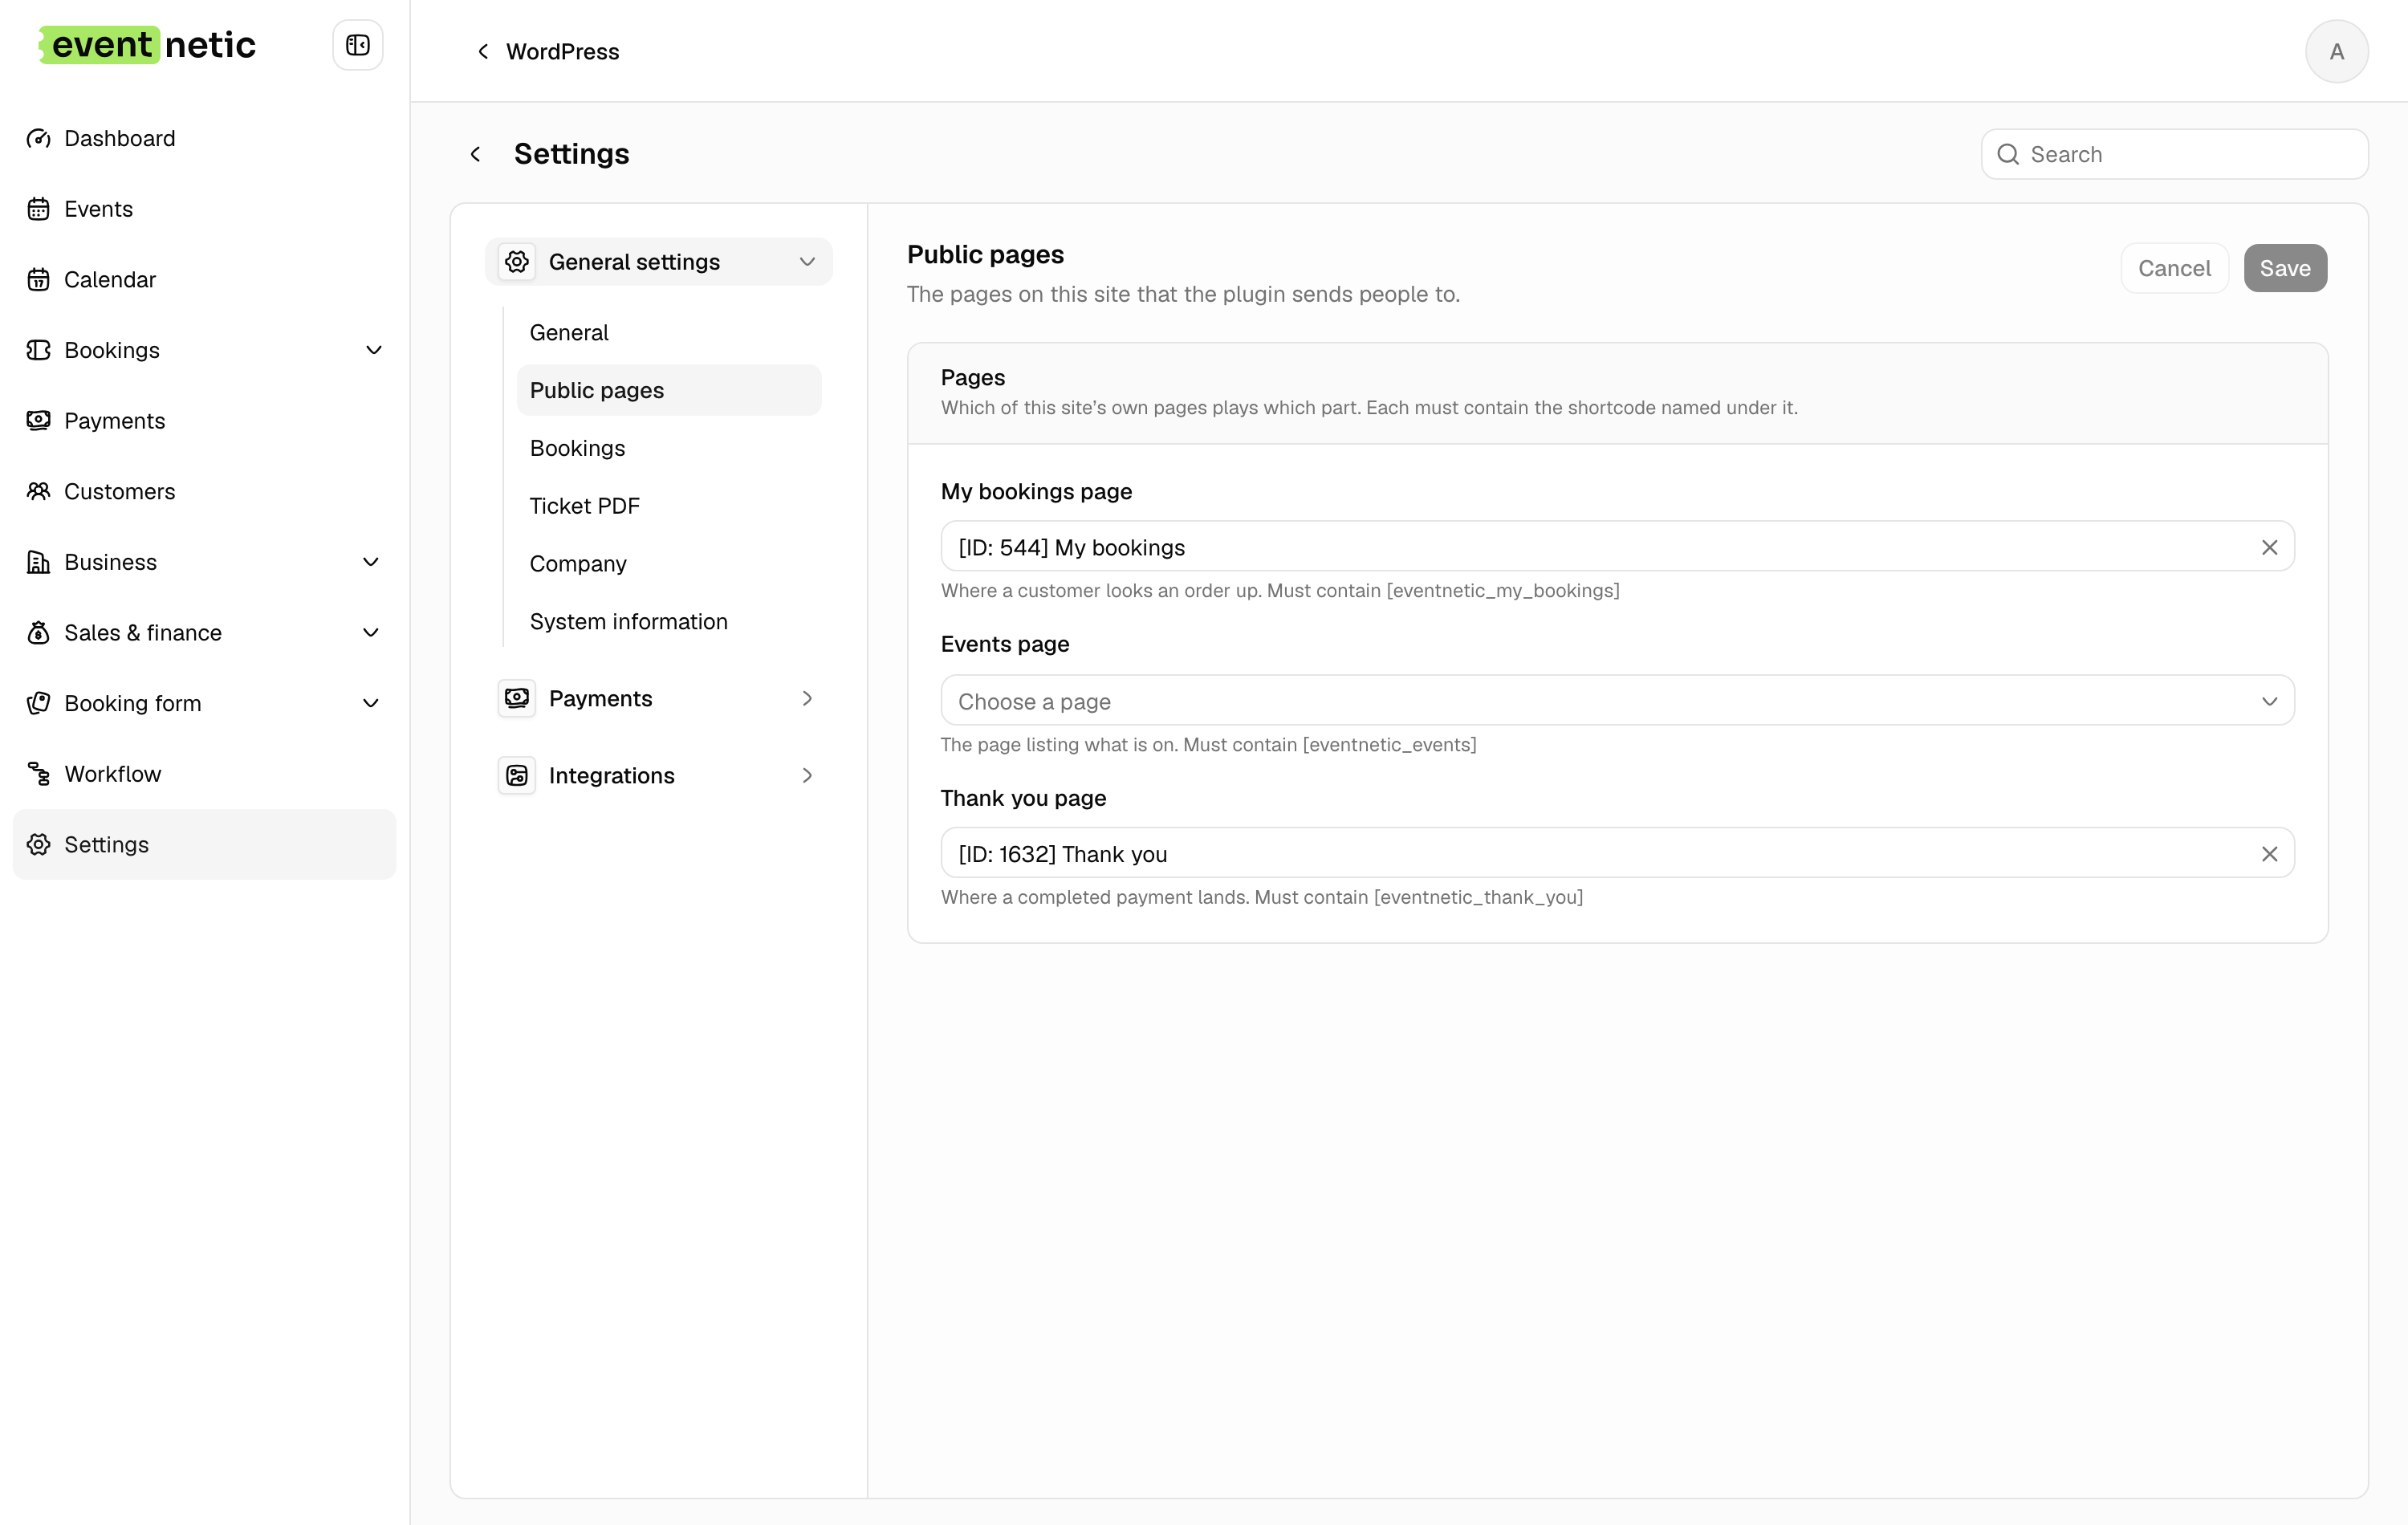
A ticketing site needs a small, specific set of pages beyond the standard WordPress defaults. The plugin uses shortcodes to embed its views on these pages, so you create the pages first in WordPress and then assign them in the plugin settings:
- Events: the public event listing showing upcoming events with dates and ticket availability
- Booking: hosts the checkout panel where buyers complete their purchase
- Thank You: the confirmation screen shown after a completed booking
- My Bookings: lets returning customers view order history and download tickets
Add the Events page to your main navigation menu immediately. Buyers who arrive on your homepage expecting to find events and cannot locate the listing in the navigation will leave rather than search for it.
Security Baseline for a Site Handling Ticket Payments
Booking records and customer data are stored in your own WordPress database on your hosting server, not on any third-party ticketing platform. That means site security is your responsibility. The baseline for a site accepting ticket payments:
- Keep WordPress core, themes, and all plugins updated. Outdated plugins are the most common WordPress attack surface.
- Use a strong, unique admin password and do not use
adminas the username. It is the first credential attackers try. - Use your admin email for a real, monitored address. WordPress sends important security notifications there.
- Your host's SSL certificate encrypts data in transit between the visitor's browser and your server. Confirm it is active before launch. Modern browsers display prominent warnings on non-HTTPS checkout pages, and those warnings stop ticket purchases.
- Consider a security plugin such as Wordfence for firewall rules and login protection.
Setup Timeline to Set Realistic Expectations
A basic setup means a working WordPress site, the ticketing plugin installed, one published event, and the payment gateway connected. That typically takes two to four hours for someone comfortable with WordPress. If your domain registrar and hosting provider are separate companies, SSL certificate provisioning can add up to 24 hours before the site is reachable over HTTPS. Register your domain and set up hosting well before your intended launch date, not on the day you plan to open ticket sales.


