
Printing a list and crossing off names at the door works until it does not. A busy entry queue, two staff members working the same sheet, or a photocopied ticket passed between friends can all break the process. QR code tickets solve these problems cleanly: every attendee receives a unique code attached to their booking, each code works exactly once, and staff at the door get an instant visual signal that tells them whether to let someone in or not.
This guide walks through how to add QR code tickets to a WordPress event website using Eventnetic, a self-hosted event ticketing plugin built for WordPress. You will set up the ticket PDF template, configure email delivery, prepare the attendee list, run the check-in scanner, assign door staff the right level of access, and understand exactly how the system handles fraud and duplicate scans.
If you are still comparing plugin options before committing, the best WordPress event plugins roundup covers the main choices side by side.
What You Need Before You Start
QR code ticket generation and the check-in scanner are paid features available from the Starter plan ($99/year for one site). The free plan covers unlimited events and bookings with offline and cash payments, a door list by name, and a live who-is-inside count, but does not include PDF ticket generation or QR scanning. More on what you can do without a paid plan is covered at the end of this guide.
Before enabling QR tickets, confirm:
- Eventnetic is installed and activated on your WordPress site
- You have an active Starter, Pro, or Elite license entered in Eventnetic > Settings > License
- At least one event is published with ticket types configured
- A payment gateway (Stripe or PayPal) is connected, or you are issuing tickets for free events
How QR Code Tickets Work in Eventnetic
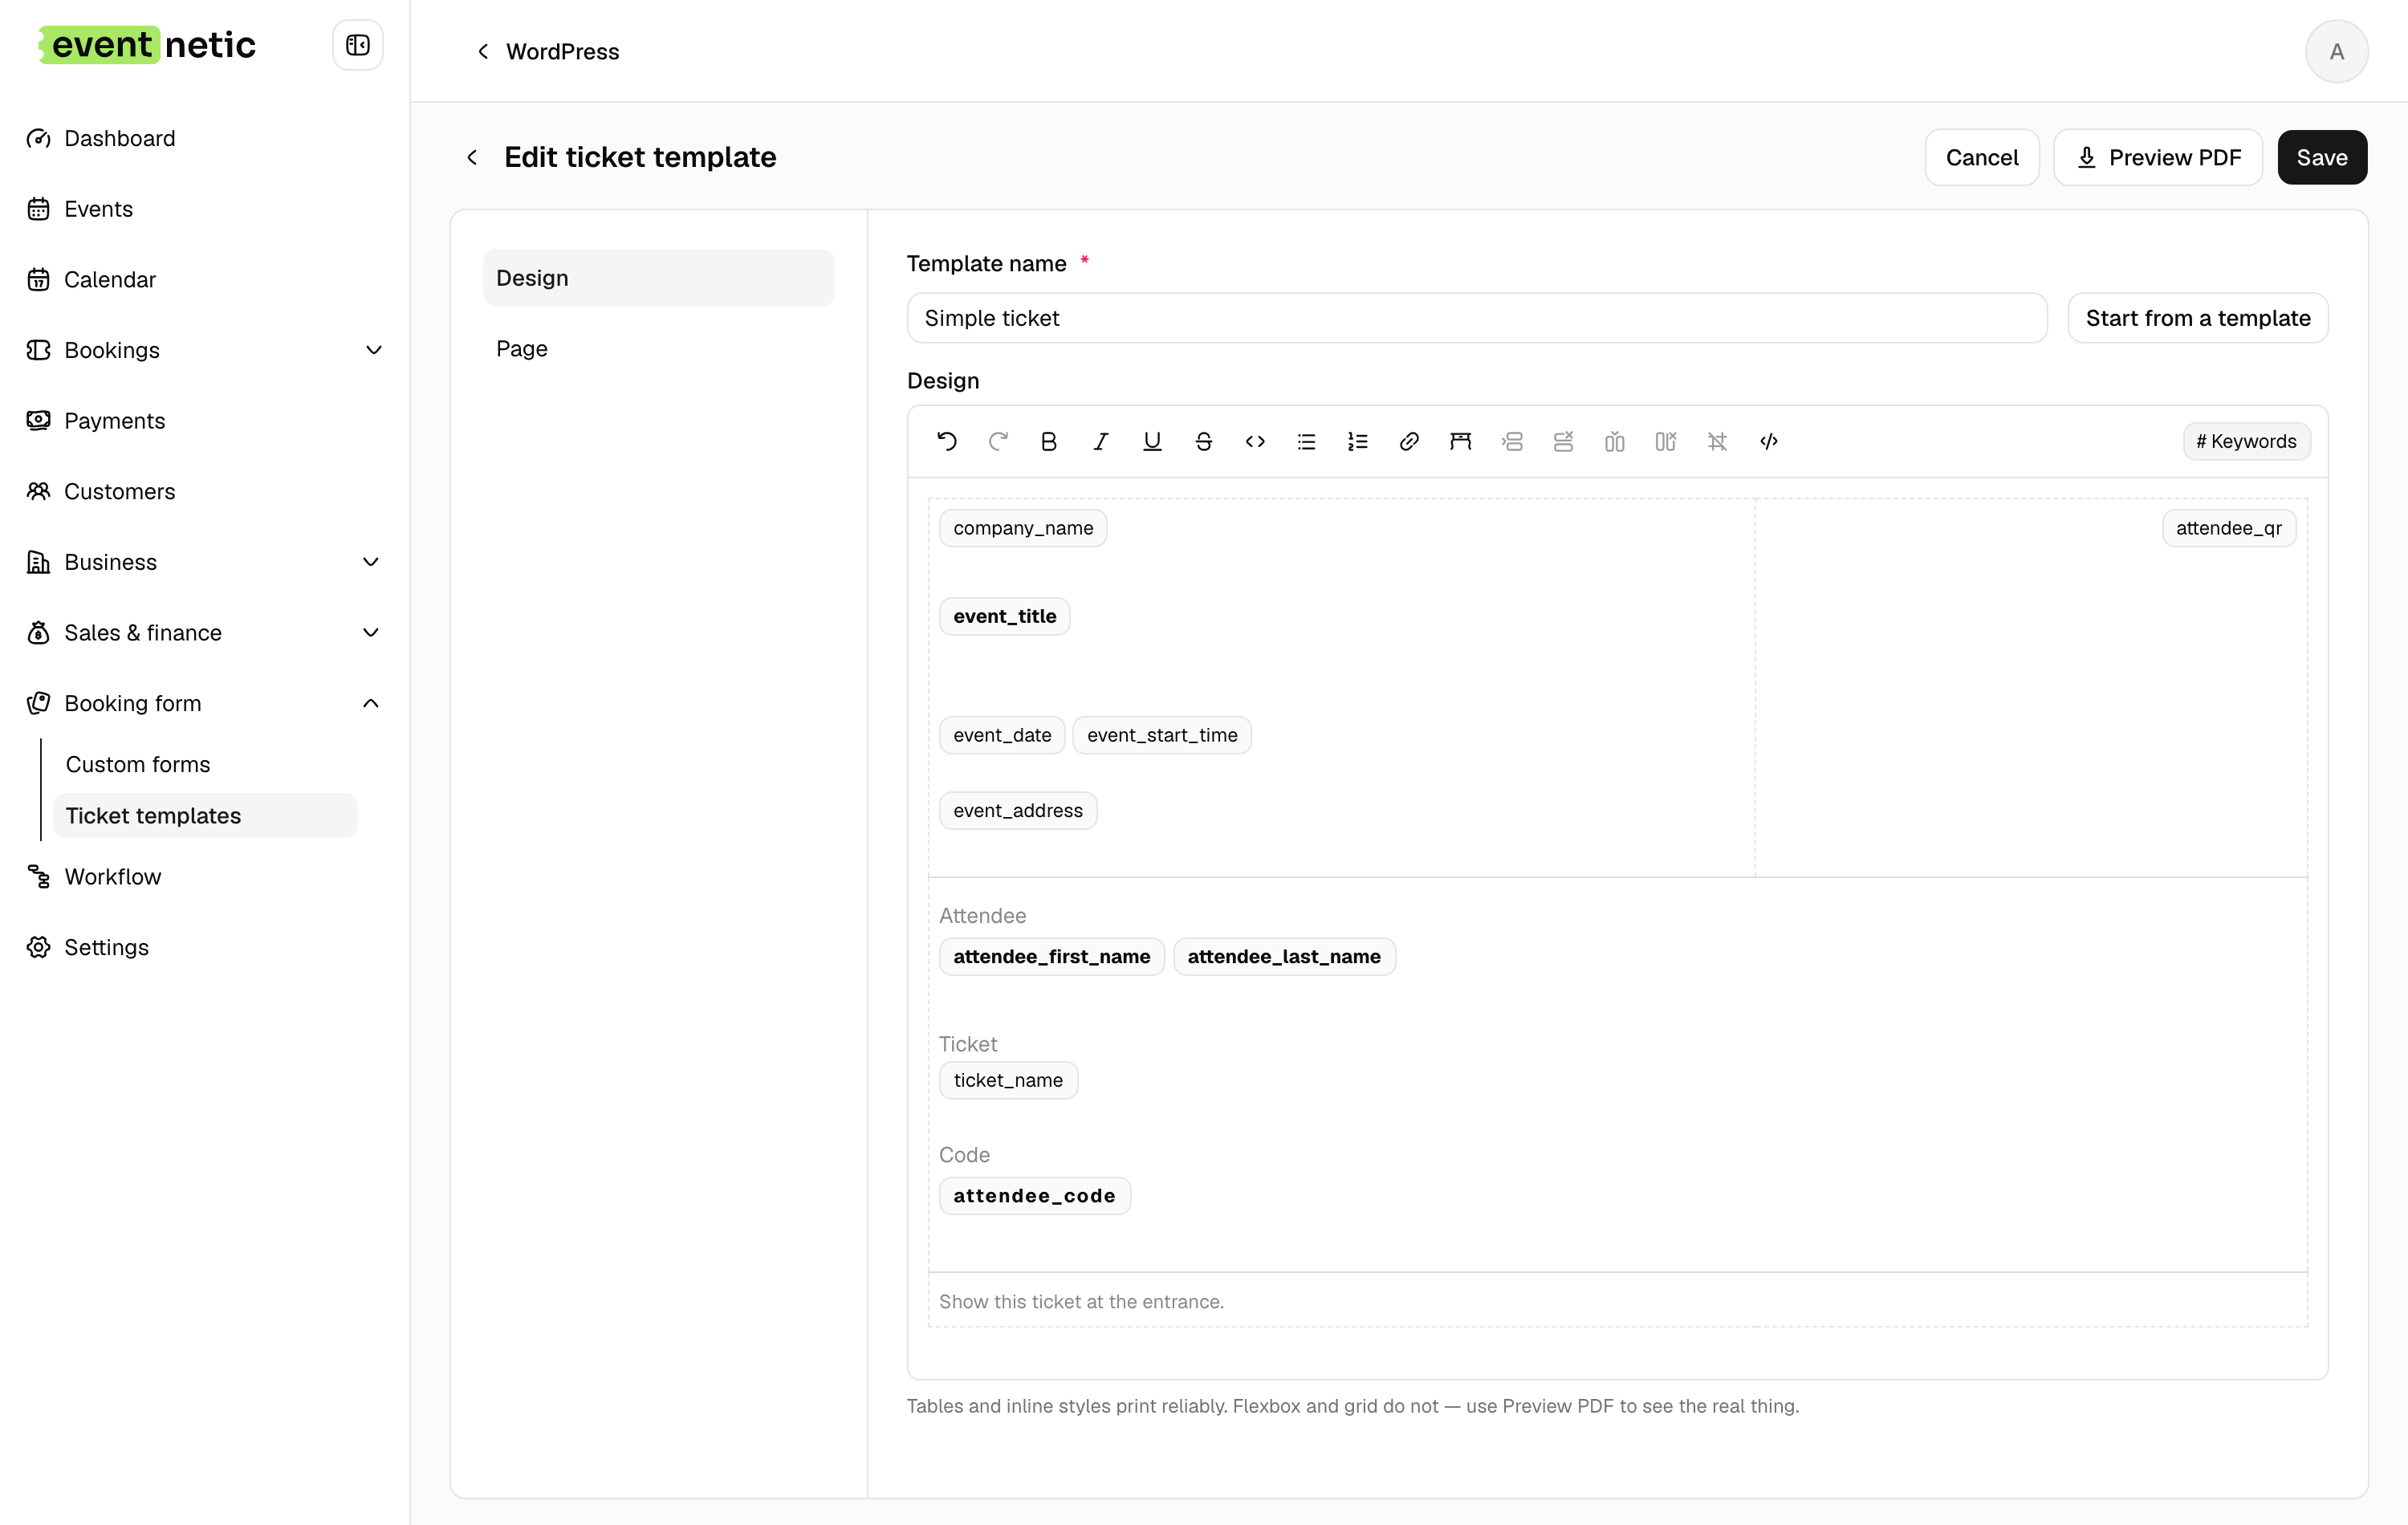
When a buyer completes a booking, Eventnetic generates one PDF ticket per seat purchased. Each PDF contains:
- The event name and date
- The venue name and address
- The ticket type and seat assignment (for reserved-seating events)
- The buyer name and booking reference
- A unique QR code
The QR code encodes a booking reference and seat identifier that only Eventnetic's check-in system can interpret. No two tickets share the same code. A code that has already been scanned is flagged immediately on any device running the check-in interface. This means a buyer who photographs their PDF and passes the image to someone else cannot use the copy to enter: the original scan marks the code as used, and the duplicate triggers a red warning.
Step 1: Configure the PDF Ticket Template
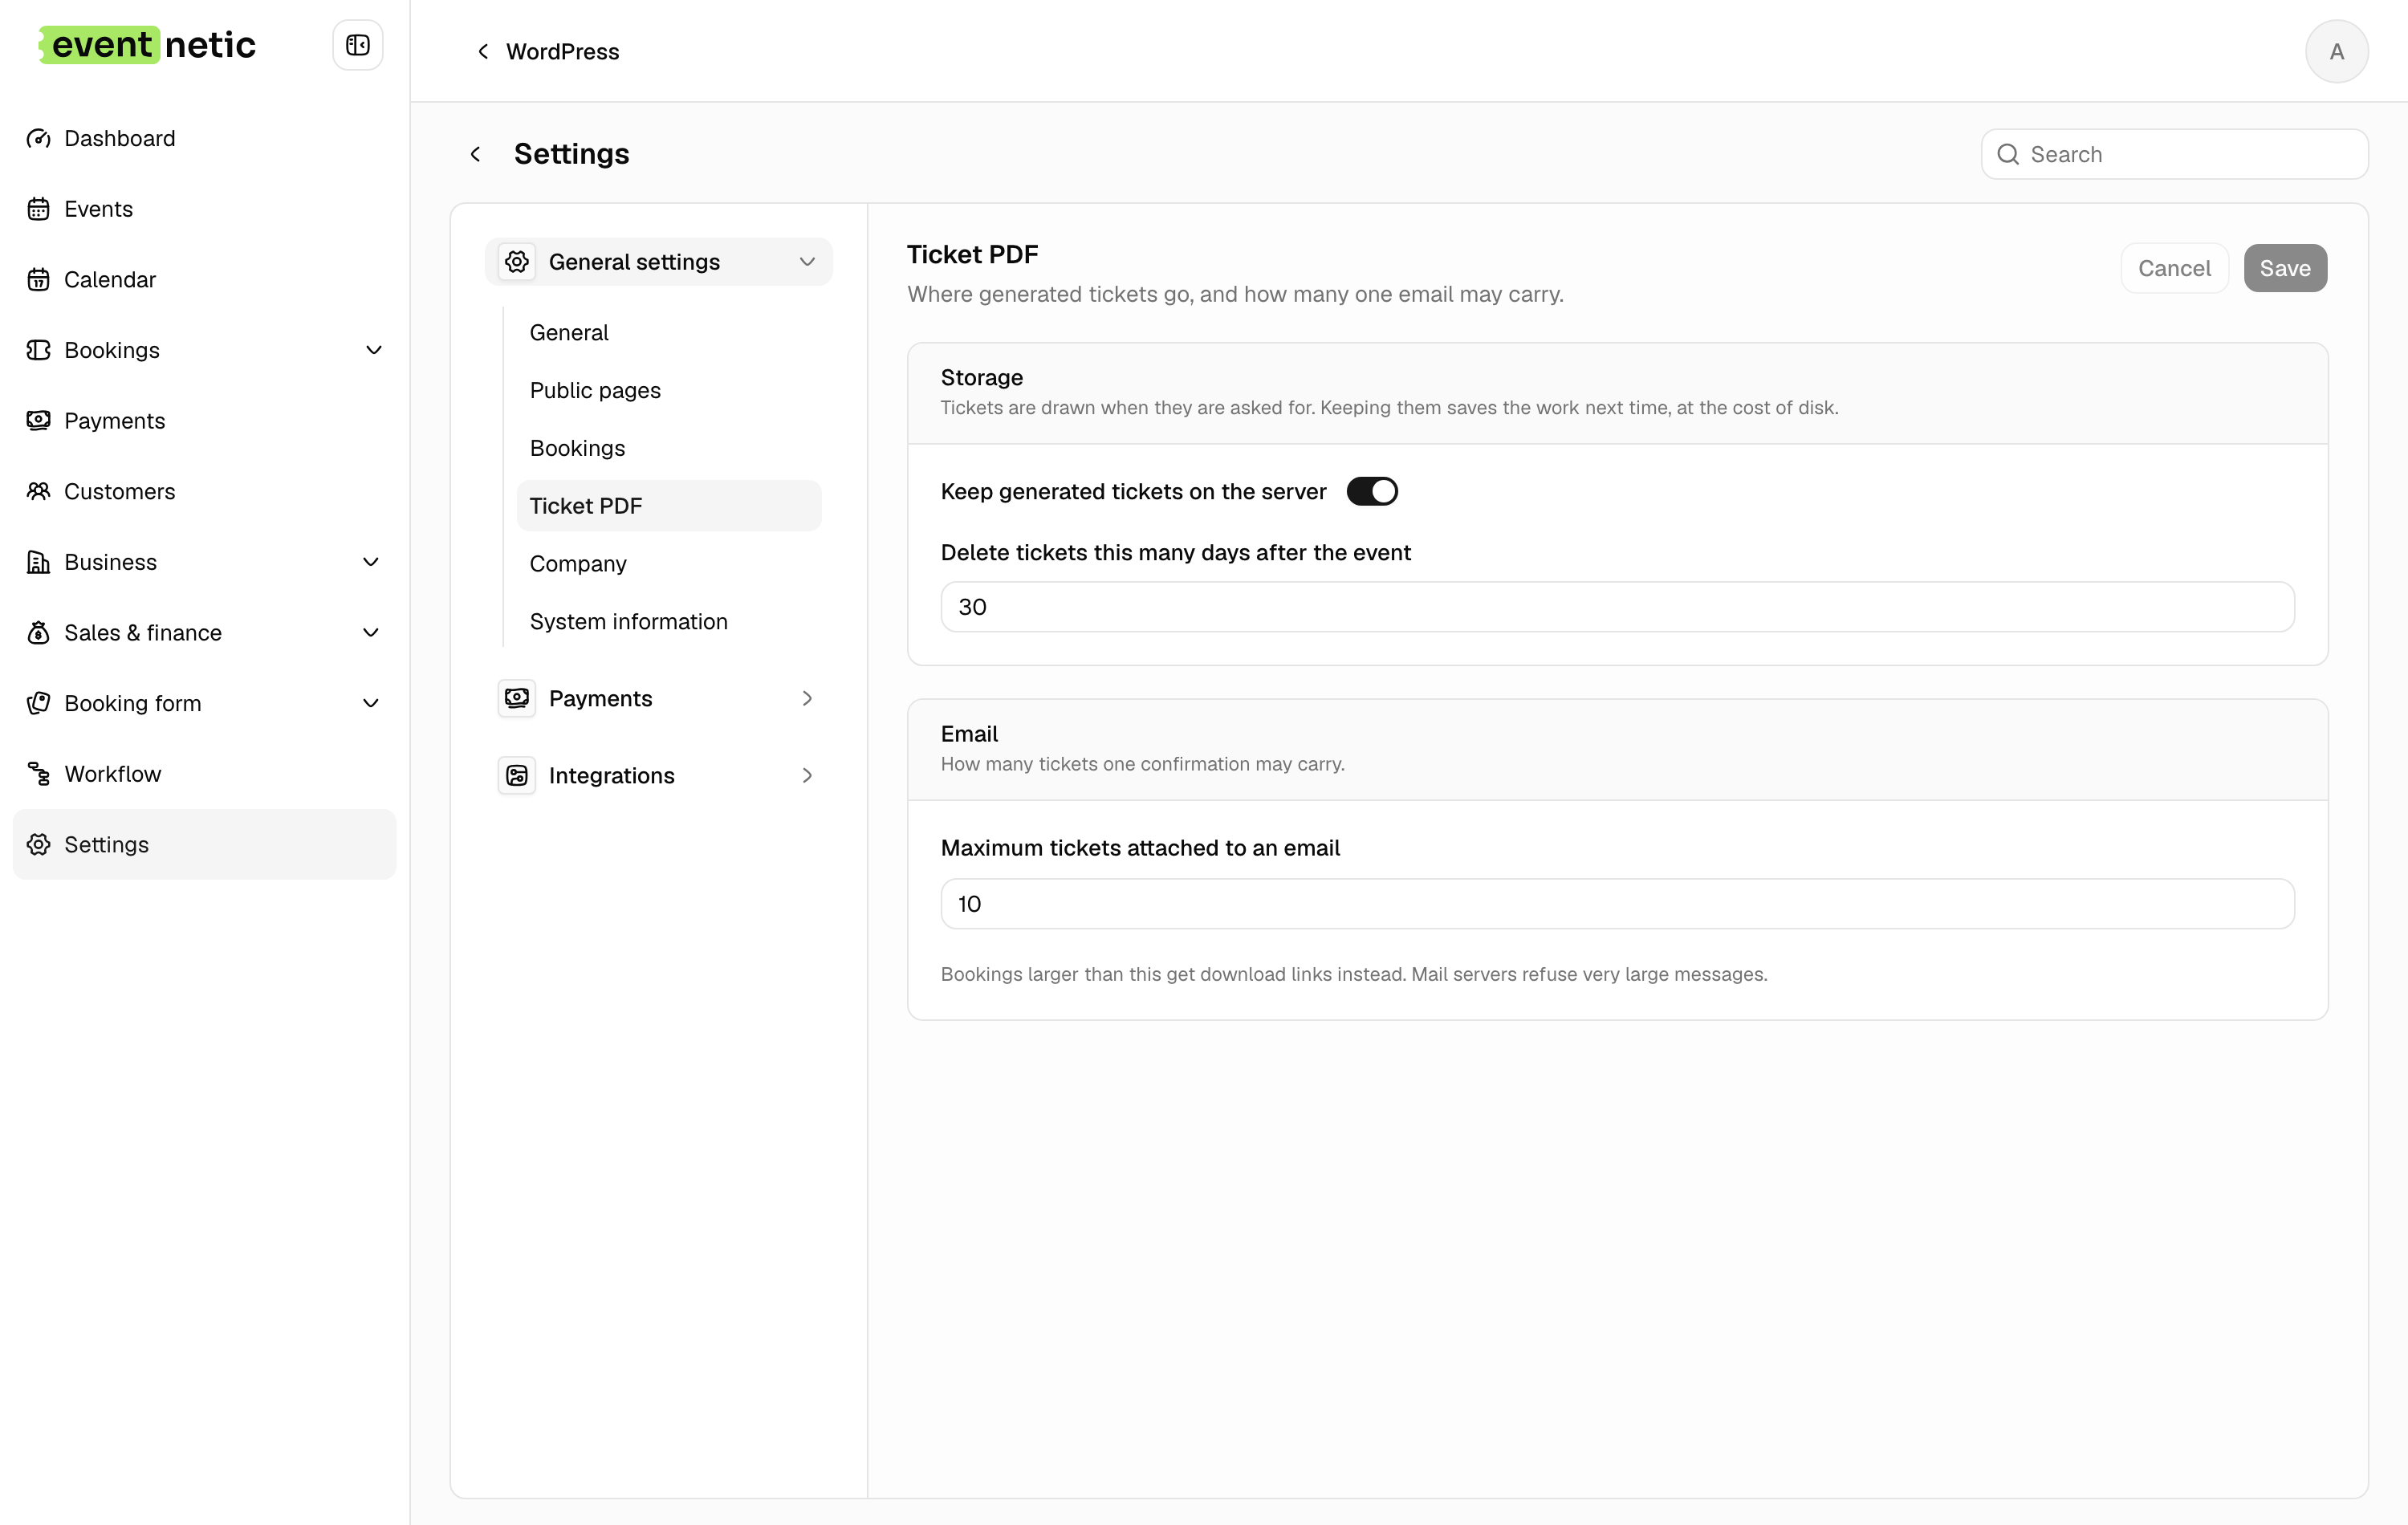
Go to Eventnetic > Settings > Tickets to set up the visual layout of the ticket PDF before any tickets are issued.
The template editor lets you set:
- Logo: Upload your organization logo. It appears at the top of every ticket. Use a high-resolution PNG with a transparent background for the best print quality.
- Background color: Set a brand color that applies to the ticket header. Leave it white for a clean, print-friendly result.
- Visible fields: Choose which information appears on the ticket. The booking reference and QR code are always included. Optional fields include the buyer name, event image, and ticket type label.
- Ticket orientation: Choose portrait (standard) or landscape. Landscape works better for venue-branded tickets with a wide logo or banner image.
Changes to the template apply to all future tickets. Tickets already sent to buyers are not regenerated automatically when you edit the template, so configure the layout before your first batch of bookings arrives.
Save the template settings and then open a test booking in Eventnetic > Bookings to preview the generated PDF. Click the booking row, look for the ticket download link, and open the PDF to confirm the QR code prints clearly and all fields appear as intended.
Step 2: Configure Email Delivery of PDF Tickets
Tickets are delivered automatically through Eventnetic's workflow automation. The default booking confirmation workflow already handles this, but you need to verify that the PDF attachment is enabled.
Go to Eventnetic > Workflows and open the booking confirmation rule (the one triggered by "Booking is created"). In the email action settings, look for the Attachments option and confirm that "Ticket PDF" is toggled on.
When this setting is active, every buyer receives their PDF ticket attached directly to the confirmation email the moment their booking is marked as approved. If you use a manual approval flow (where bookings stay in Pending status until you confirm them), attach the ticket to the "Booking status changes to Approved" trigger instead.
What the confirmation email includes
With PDF attachment enabled, the buyer receives:
- A confirmation email with event name, date, venue, and booking reference in the body
- One PDF attachment per seat purchased, each with its own unique QR code
- The correct ticket type label on each PDF if the buyer purchased multiple tiers in one order
There is no separate step for the buyer to download their tickets from a customer portal (although a My Bookings page is available for that too). The ticket arrives in their inbox with no extra clicks required.
Improving email deliverability
If confirmation emails go to spam, configure SMTP delivery. Go to Eventnetic > Settings > Email, switch from wp_mail to SMTP, and enter credentials from a transactional email provider such as Mailgun, Postmark, or SendGrid. This routes outgoing ticket emails through a dedicated sending infrastructure rather than your shared hosting server, which significantly reduces deliverability problems.
Step 3: Review the Attendee List
Eventnetic builds an attendee list for every event date automatically. This is useful both before the event (to prepare door staff) and during entry (as a backup when scanning fails or a device loses connectivity).
To access the attendee list:
- Go to Eventnetic > Check-in in the WordPress admin.
- Select the event and the specific date you are running.
- The list shows all ticket holders for that date: buyer name, ticket type, seat (for reserved events), booking reference, and check-in status.
You can search the list by name or booking reference. The check-in status column shows whether each ticket has been scanned or is still waiting. This view updates in real time, so if one staff member is scanning at the main entrance while another monitors the list, the list reflects every scan as it happens.
Exporting the attendee list
If you want a printed backup, go to Eventnetic > Bookings, filter by event and date, and export the filtered results as a CSV. Print the export before the event and keep it as a fallback in case devices run out of battery or lose Wi-Fi.
Step 4: Run the Check-in Scanner
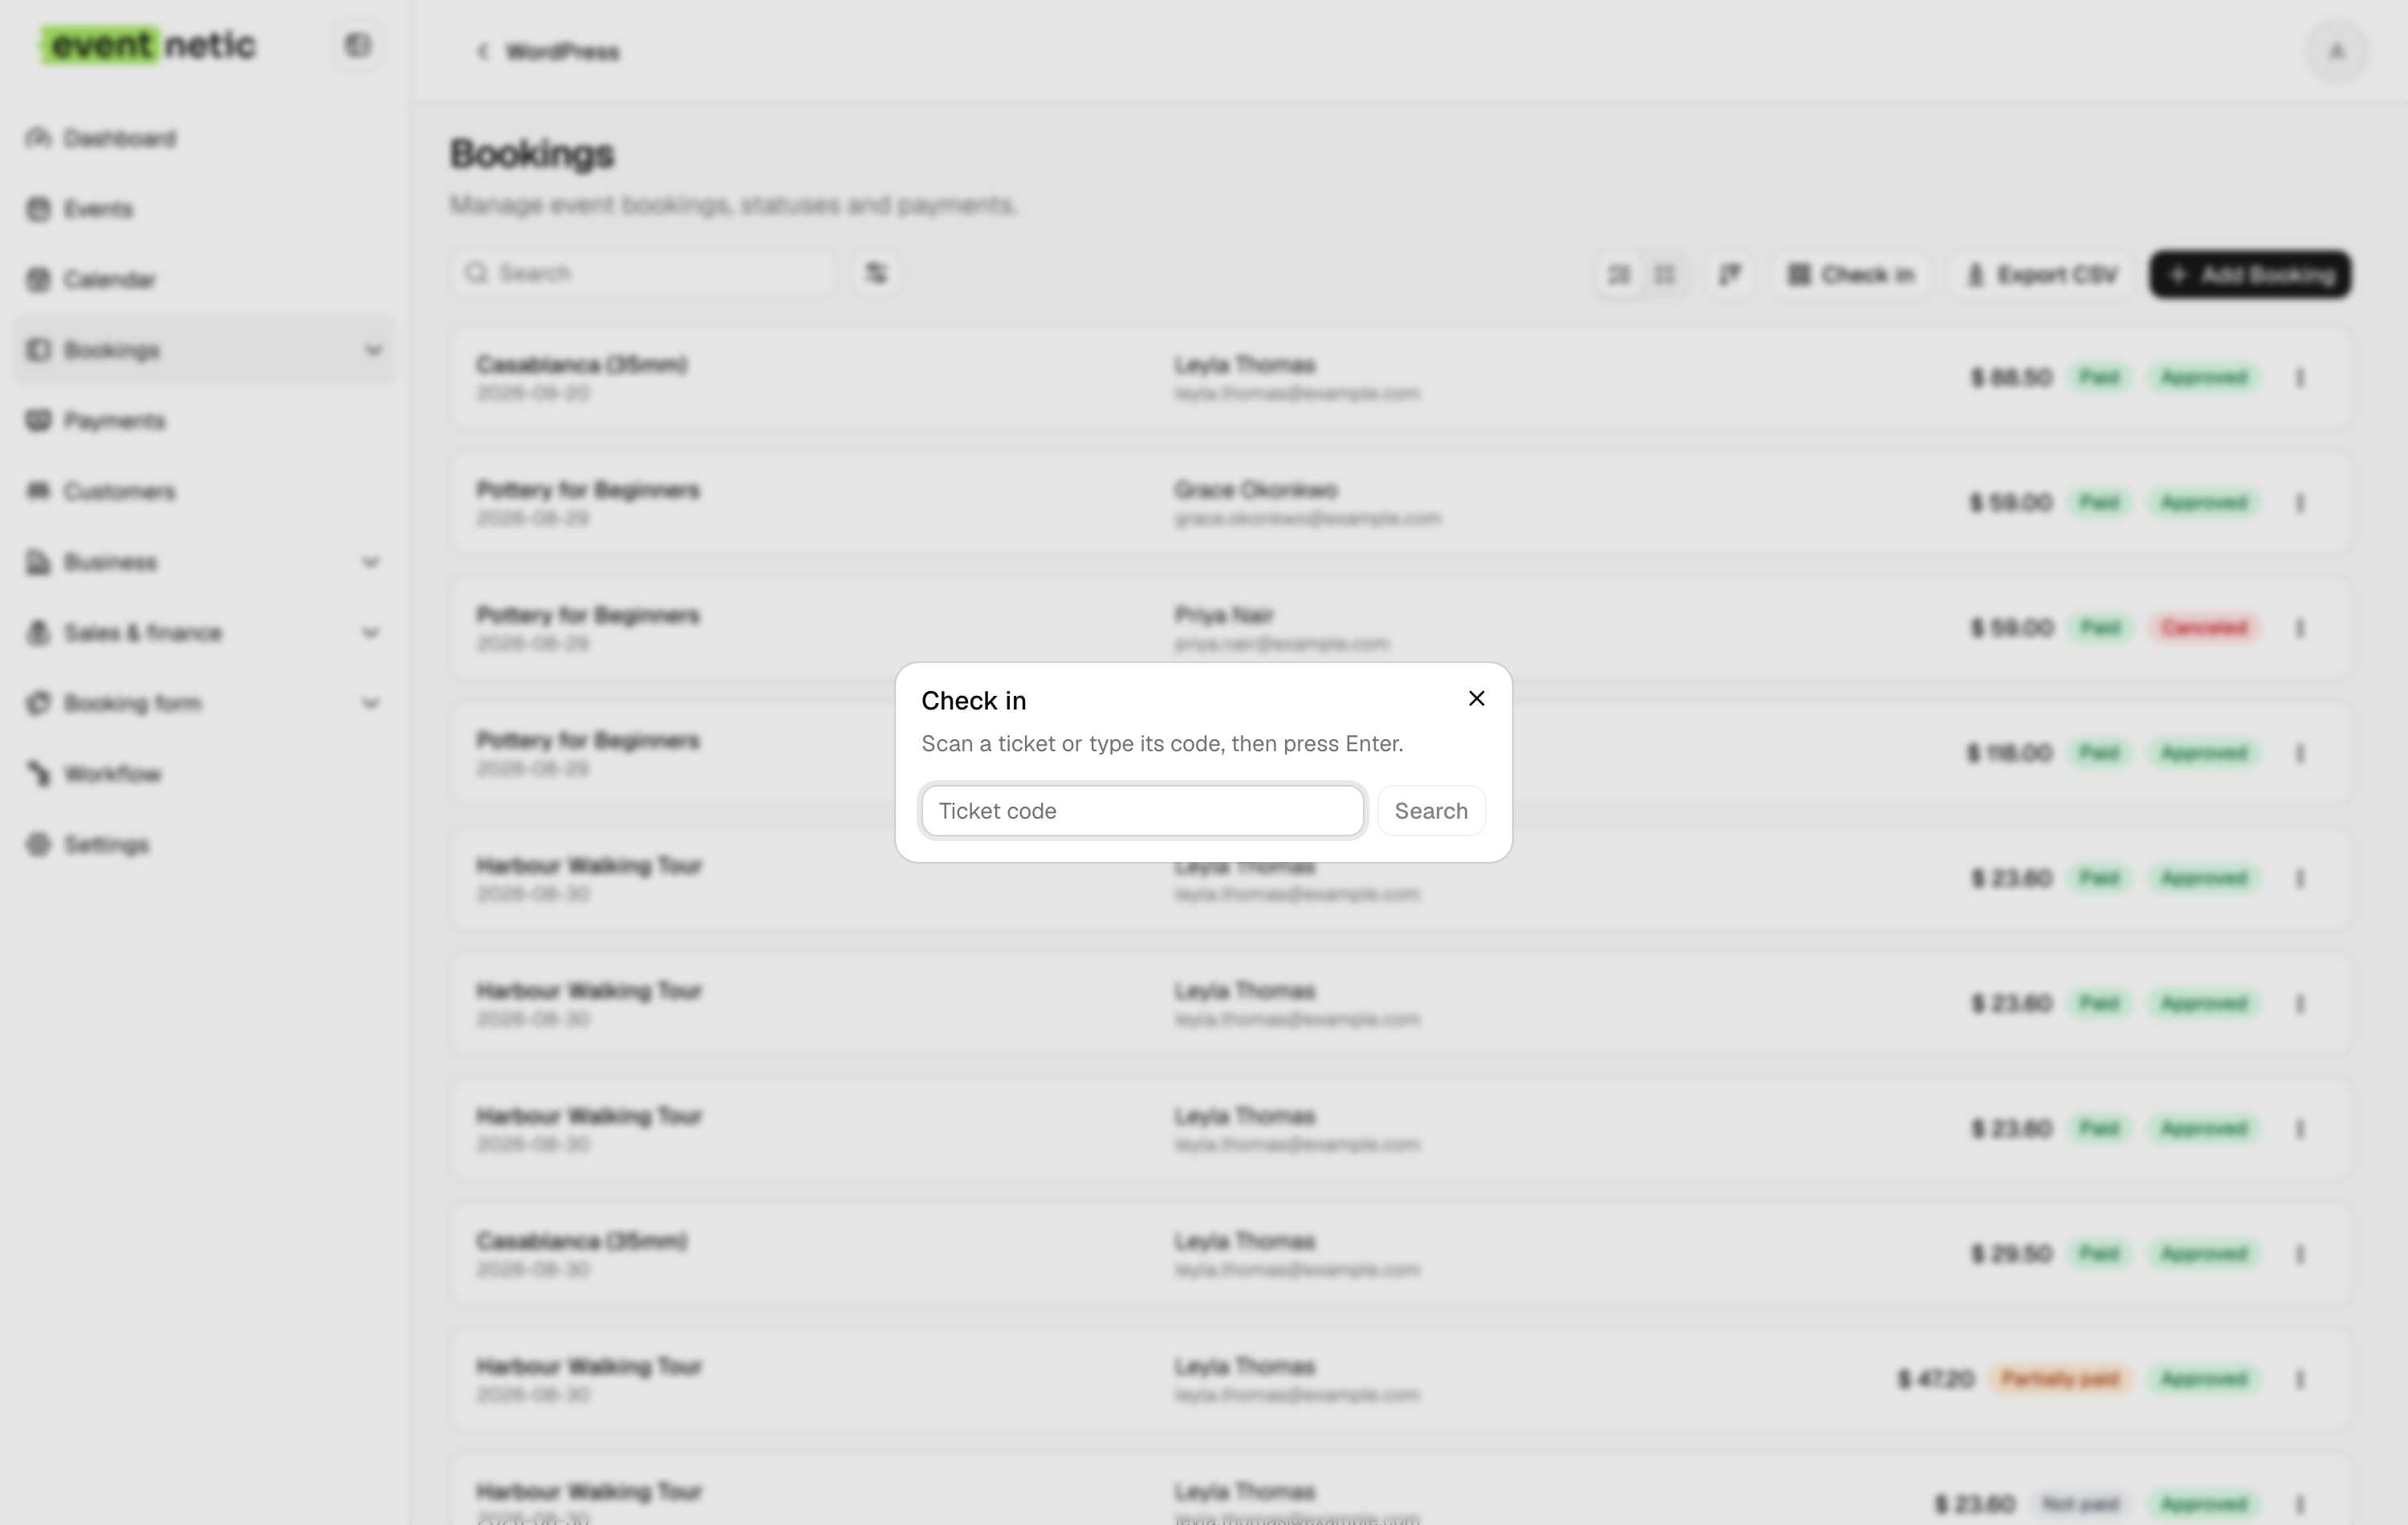
The check-in scanner requires no dedicated app. Any device with a camera and a browser can scan tickets: a staff member's phone, a tablet at the entrance, or a laptop with a webcam. The interface runs in the browser and does not require an app store download or installation.
To open the scanner:
- Go to Eventnetic > Check-in in the WordPress admin.
- Select the event and the specific date you are running from the dropdowns.
- Click Start Scanning.
- When your browser requests camera access, allow it.
- Point the camera at the QR code on the attendee's ticket, either printed or on their phone screen.
The scanner reads the code in approximately one second. The result appears immediately:
- Green screen with a check mark: Valid ticket, first scan. The buyer's name, ticket type, and seat appear on screen. Mark them as entered.
- Red screen with a warning: The code has already been scanned and is marked as checked in. Staff should direct the attendee to a supervisor.
- Red screen with a different warning: The code does not match the current event or date. This can mean a ticket for a different show, a ticket for the same event on a different date, or a fabricated or corrupted code.
The scanner stays active between scans. There is no need to reload the page or navigate back to a menu between attendees. For high-volume entry points such as the main gate of a music event or the lobby of a cinema, two staff members with two devices scanning simultaneously is more efficient than one person managing a queue.
Timed-entry venues that need to control exactly how many people enter during each slot use the scanner the same way, filtering by the specific time slot as the event date. The timed entry guide covers this configuration in detail.
Step 5: Set Up Door Staff Access
Door staff do not need full WordPress admin access to use the check-in scanner. Granting admin access to temporary event staff is a security risk: they could view revenue figures, export booking data, or accidentally change plugin settings.
Eventnetic includes a dedicated Door Staff role with a restricted permission set. A user assigned this role can:
- Open the check-in interface and scan tickets for any event
- View the attendee name list and check-in status for the event
- Search attendees by name or booking reference
A Door Staff user cannot:
- View payment amounts or revenue reports
- Access booking financial details
- Edit or delete events, bookings, or customers
- Change any plugin settings
To create a door staff account:
- Go to Users > Add New in your WordPress admin.
- Enter the staff member's name and email address.
- Set the WordPress role to Eventnetic Door Staff.
- Set a password and share the login credentials securely before the event.
You can create one shared Door Staff account used by multiple staff members, or create individual accounts per person. Individual accounts give you a cleaner audit trail if you want to review who scanned which ticket at what time.
On the day of the event, door staff log in at yourdomain.com/wp-admin, navigate to Eventnetic > Check-in, select the event and date, and begin scanning. They will not see the dashboard, revenue figures, or any admin screens outside the check-in panel.
For a broader comparison of tools focused specifically on door management, the WordPress event plugins roundup covers how several plugins handle door staff access and scanning.
Fraud and Double-Scan Prevention
Each QR code in Eventnetic encodes a unique identifier tied to a specific booking and seat. The code itself is not a simple sequential number or easily guessable string. When the scanner reads a code, it queries the database against the current event and date, not just the code string in isolation.
How a duplicate scan is caught
When a valid ticket is scanned for the first time, Eventnetic marks that specific seat as checked in and records the timestamp. If the same code is presented again, the scanner shows an immediate red warning and displays the time of the first scan. Staff at the door can see exactly when the ticket was already used.
This prevents the most common fraud patterns:
- A buyer who screenshots the QR code from their PDF and sends it to a friend: the original scan uses the code; the copy triggers the red warning.
- A buyer who presents a printed duplicate of someone else's ticket: only the first scan is accepted.
- A fraudulent ticket generated by copying a code from a legitimate one but altering the booking reference: the altered code does not match any record and is rejected with a "not found" message.
Seat-level vs booking-level codes
Each QR code in Eventnetic corresponds to one seat, not one booking. A buyer who purchases four tickets for a family receives four separate PDFs with four separate QR codes. At the door, each person presents their own code. This prevents one buyer from generating a single booking confirmation and claiming it covers the whole group.
Handling disputes at the door
When the scanner shows a red warning for a duplicate code, train staff to calmly note the time of the first scan shown on screen and ask the attendee to present another ticket. Most disputes resolve quickly when the attendee realizes their companion already scanned in. For genuine cases where two people legitimately share a code due to a delivery error, the override option in the attendee list lets an authorized user manually mark a ticket as checked in while noting the exception.
Venue and Cinema Use Cases
The check-in workflow described in this guide works the same way regardless of event type, but the setup varies slightly depending on how the venue assigns seats. For events where every buyer selects a specific seat at checkout, the QR code and the attendee list both include the row and seat number, giving door staff an instant verification reference even without scanning.
Cinema ticketing operates on the same seat-per-QR model, with the seat map built at the venue level and reused across every screening. A sold seat for Friday night is released back into the pool for Saturday without any manual reset.
What the Free Plan Covers at the Door
If you are on the Eventnetic free plan, QR scanning is not available, but you can still run a controlled entry process using the door list.
In the check-in interface, select your event and date, and the attendee list loads automatically. Staff search by name or booking reference and tick each arrival manually as they arrive. This works well for:
- Small community events where entry volume is manageable
- Private bookings and corporate events with known attendee lists
- Cash-at-the-door events where payment and entry happen simultaneously
- Pilot events where you want to test the ticketing flow before upgrading
The free plan also includes a live who-is-inside count per event date, which updates as staff tick arrivals. For a full breakdown of what the zero-cost plan includes, the free WordPress event ticketing guide covers every included feature in detail.
Frequently Asked Questions
Do attendees need to print their ticket, or can they show it on their phone?
Either works. The Eventnetic scanner reads QR codes from printed paper, phone screens, and tablet screens. Screen brightness may need to be turned up slightly in direct sunlight, but this is rarely a problem indoors or in normal outdoor lighting conditions.
What happens if a device loses internet during scanning?
The check-in interface requires an active connection to mark tickets in real time. If a device goes offline, it cannot process scans or update the attendee list. Keep the CSV export of the attendee list available as a printed backup for exactly this scenario. For events in venues with poor Wi-Fi, consider setting up a mobile hotspot dedicated to the check-in devices.
Can I run the scanner on multiple devices at the same time?
Yes. Multiple staff members with separate devices can scan simultaneously. All scans update the same attendee list in real time. A code presented at one entry point is immediately flagged as used if someone attempts to present the same code at a second entry point, regardless of which device processed the first scan.
Can I reissue a ticket if a buyer loses their email?
Yes. Go to Eventnetic > Bookings, open the booking, and resend the confirmation email from the booking detail view. The same PDF ticket with the same unique QR code is re-sent to the buyer's email address. The code is still valid at the door. Do not manually change the booking status between resending, as that may trigger an unintended notification.
Does QR scanning work for free events with zero-price tickets?
Yes. If a ticket type has a price of zero, buyers still complete the checkout form and receive a confirmation email with a PDF ticket and QR code (Starter plan required). This setup works for free community events, preview screenings, press nights, or charity events where you want a headcount and check-in control without collecting payment.
Where can I learn more about setting up tickets and payments?
If you want a guide focused specifically on the payment and checkout workflow, the sell tickets on WordPress guide covers connecting Stripe or PayPal, testing the checkout, and going live with ticket sales.
Summary
QR code tickets on WordPress remove the main weaknesses of paper lists: duplicate entry, manual errors, and the inability to see in real time who has already arrived. Eventnetic handles the full workflow from a single plugin: it generates the PDF, attaches it to the confirmation email, tracks each unique code, and runs the browser-based scanner that staff use at the door.
The core setup requires the Starter plan. The check-in scanner, PDF tickets with unique QR codes per seat, role-based door staff access, and double-scan fraud prevention are all included in one licence fee with no ongoing commission taken from ticket sales.
The free plan remains a practical option for events that do not need QR scanning, with unlimited events and bookings, a searchable door list, and real-time attendance count. When your events grow or when entry speed and fraud prevention become priorities, upgrading to Starter adds the full QR workflow without changing anything else about how Eventnetic is configured.


